
Documentation/Integrations
Webhooks
Get real-time notifications in your own systems when things happen.
Webhooks let your own systems receive real-time notifications when something happens in Engage — a contact completes KYC, a payment succeeds, an email is opened. Your server gets an HTTP POST the moment the event fires, so you can stay in sync without polling.
Your webhook endpoint must be a publicly accessible HTTPS URL. Engage sends a POST request to that URL whenever a subscribed event fires.
Use a tool like webhook.site to inspect real payloads before pointing Engage at your production server.
1. Create a webhook
Open your webhook settings
From the sidebar, open Integrations → Webhooks.
Name it
Enter a Webhook Name you'll recognise later, e.g. "My CRM Webhook".
Enter your URL
The HTTPS address on your server that will receive the payload.
Click CREATE WEBHOOK
RESET clears the form if you need to start over.
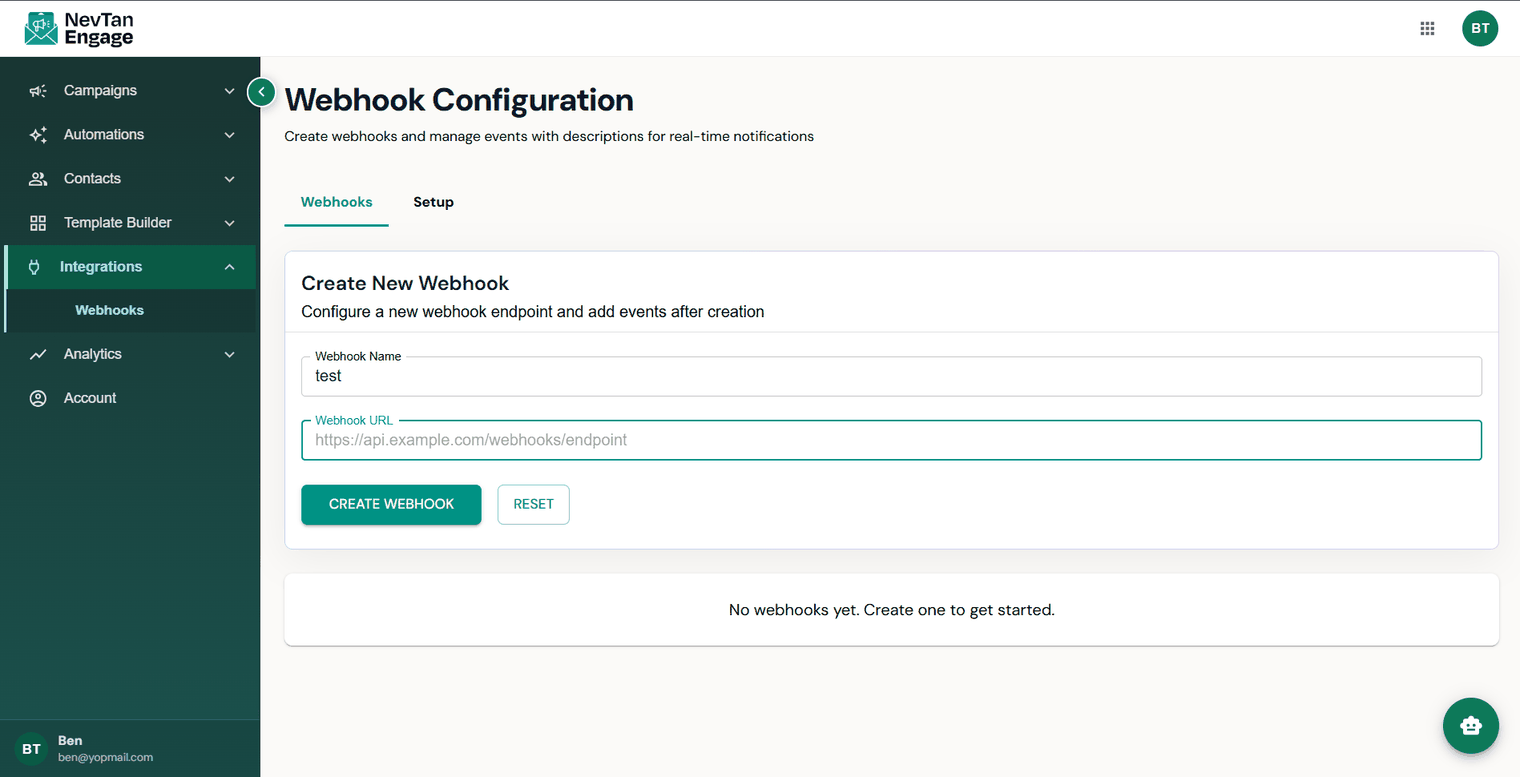
Creating a webhook
How the URL is built
| Part | What it is | Example |
|---|---|---|
| Base URL | Your server's root address — every event URL starts with this | yourserver.com/webhook |
| Event URL | Base URL + the event name path | yourserver.com/webhook/kyc |
POST yourserver.com/webhook/kyc
Content-Type: application/json

{
  "event": "kyc",
  "contact_id": "cnt_abc123",
  "email": "user@example.com",
  "status": "verified",
  "timestamp": "2026-03-18T10:30:00Z"
}
2. Your webhook is registered
After saving, the webhook appears below the form with its name, endpoint URL, and an active/inactive toggle. New webhooks are active by default.
| Status | Meaning |
|---|---|
| Active | Enabled — POST requests are sent when events fire |
| Inactive | Paused — nothing is sent until you re-enable it |

A webhook and its event toggles
3. Add events
A webhook does nothing until you tell it which events to send.
Click Add Event
On your webhook card.
Name and describe it
Enter an Event Name and a short Event Description.
Save
Repeat to add as many events as you need to the same webhook.

Adding an event
Common business events
| Event | When it fires | What to do with it |
|---|---|---|
kyc_verified | A contact completes KYC verification | Unlock features, update CRM status, move them into a verified segment |
payment_completed | A contact makes a successful payment | Tag them as a paying customer, add to a premium list, start a post-purchase sequence |
email_opened | A recipient opens a campaign email | Engagement scoring, moving contacts into high-engagement segments |
Each event has its own active/inactive toggle. An inactive event sends nothing, even if its parent webhook is active.
Example payloads
{
  "event": "kyc_verified",
  "contact_id": "cnt_abc123",
  "email": "user@example.com",
  "first_name": "Jane",
  "last_name": "Doe",
  "status": "verified",
  "verified_at": "2026-03-18T10:30:00Z",
  "timestamp": "2026-03-18T10:30:01Z"
}{
"event": "payment_completed",
"contact_id": "cnt_abc123",
"email": "user@example.com",
"transaction_id": "txn_xyz789",
"amount": 99.00,
"currency": "USD",
"plan": "pro_monthly",
"paid_at": "2026-03-18T11:00:00Z",
"timestamp": "2026-03-18T11:00:01Z"
}4. Trigger a webhook against a list
You can fire an event for every contact in a list — useful for bulk-syncing an audience into an external system.
Open the list
Go to Contacts → Lists and open it.
Go to the WebHook tab
Webhook Events lists every event you've configured in webhook settings, each with an Active / Inactive chip. Refresh re-reads the list.
Click Import on the event you want
Only active events can be imported. Engage sends one POST per contact in that list and shows a progress dialog while it runs.
A large list means a large number of requests. Make sure your endpoint can handle the volume and responds quickly.
Troubleshooting
| Problem | Likely cause & fix |
|---|---|
| No requests arriving | Check the webhook and the individual event are both active. Confirm the URL is HTTPS and publicly reachable. |
| Requests hitting the wrong path | The full URL is Base URL + event path — verify both halves. |
| Some events work, others don't | Each event has its own toggle — check the inactive one. |
| Can't tell what's being sent | Point the webhook at webhook.site temporarily and inspect the raw payload. |
Best practices
- Respond fast (2xx), process later. Acknowledge immediately and queue the work — slow endpoints time out.
- Make handlers idempotent. Use
contact_id+timestampto avoid double-processing a redelivered event. - Validate before trusting. Treat incoming payloads as untrusted input.
- Never put secrets in the URL. Use headers or a signed payload.
Webhooks require a Starter plan or above.